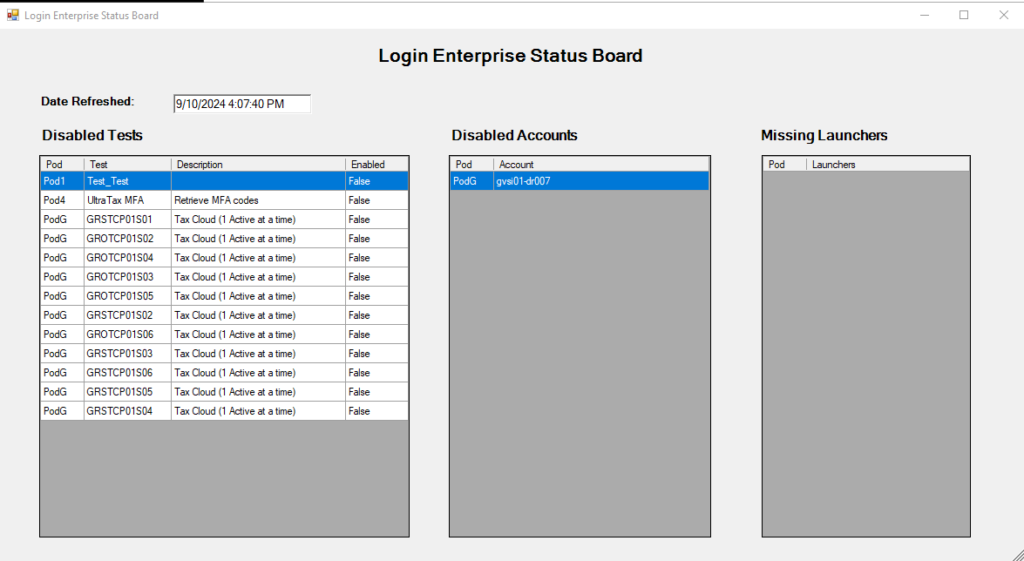
As I mentioned before, I absolutely abhor using browser based tools. Unfortunately, that is the way of the world now. But, where I can, I will try and use a Windows form to display information or to interact with data.
To that end, I changed the StatusBoard.ps1 to build a Winform and display the disabled tests, accounts and launchers.
Winforms
There are two ways to build a WinForm in Windows, both using .NET assemblies. One is Winforms and the other is WPF (Windows Presentation Foundation). There are numerous articles on the Internet that describe how to use these way better than I can. WinForms is old-school and what we used in the old Visual Basic/VBscript days, whereas WPF is more modern and can better display when using 4K screens. I have used WinForms as I am more familiar with this method.
There are also a number of ways to create your form in Visual Studio and use that to create a Powershell script that builds the form. This can be done with both WinForms and WPF. Search for that in Google or YouTube.
I started using Vistual Studio to create my basic form with 2 datagrids, one for the Tests and one for the Accounts. This form also had the title header and labels for the 2 sections. Then I manually added a testbox that shows the date/time of the displayed data and also a datagrid to display the missing launchers. For a good article on how to do this, check out Creating Extensive PowerShell GUI Applications – PART 1 and Creating Extensive PowerShell GUI Applications – PART 2, which is what I followed.
Powershell
As building a Winform in Powershell is a ton of code to create and configure each control, I am not going to present the full code. I will talk about the relevant parts and the logic to populate and update the datagrids.
Setting up the environment
First, like the previous version, I setup variables for my LE Databases. However, I set these as global variables so that they can be used by the various functions later on.
$global:BSQLServer = "<sql server1>"
$global:db1 = "<pod1 DB>"
$global:db2 = "<pod2 DB>"
$global:db3 = "<pod3 DB>"
$global:db4 = "<pod4 DB>"

$global:VSQLServer = "<sql server2>"
$global:dbV = "<podv DB>"

$global:GSQLServer = "<sql server3>"
$global:dbG = "<podg DB>"
Next, I add the .NET assemblies for building Winform objects.
# Loading external assemblies
Add-Type -AssemblyName System.Windows.Forms
Add-Type -AssemblyName System.Drawing
Here is the code that defines the form object and the various controls on the form.
$Form1 = New-Object System.Windows.Forms.Form

$dataGridView1 = New-Object System.Windows.Forms.DataGridView
$dataGridView2 = New-Object System.Windows.Forms.DataGridView
$AcctsPod = New-Object System.Windows.Forms.DataGridViewTextBoxColumn
$AcctsUserName = New-Object System.Windows.Forms.DataGridViewTextBoxColumn
$TestsPod = New-Object System.Windows.Forms.DataGridViewTextBoxColumn
$TestsTest = New-Object System.Windows.Forms.DataGridViewTextBoxColumn
$TestsDescription = New-Object System.Windows.Forms.DataGridViewTextBoxColumn
$TestsEnabled = New-Object System.Windows.Forms.DataGridViewTextBoxColumn
$dataGridView3 = New-Object System.Windows.Forms.DataGridView
$LaunchersLaunchers = New-Object System.Windows.Forms.DataGridViewTextBoxColumn
$lblTests = New-Object System.Windows.Forms.Label
$lblTimedate = New-Object System.Windows.Forms.Label
$txtTimedate = New-Object System.Windows.Forms.textbox
$lblAccts = New-Object System.Windows.Forms.Label
$lblLaunchers = New-Object System.Windows.Forms.Label
$lblForm = New-Object System.Windows.Forms.Label
Setting the form to auto-update the DataGridViews
Another benefit of using a WinForm over the CSV/HTML page is that I can have set the form to auto-update the DataGridView objects.
To do this, I used the Form.Timer object with an interval of 1000ms.
$timer = New-Object System.Windows.Forms.Timer
$timer.Interval = 1000
$timer.Add_Tick({UpdateForm})
$timer.Enabled = $True
The Add_Tick method calls the function UpdateFrom which is defined as:
Function UpdateForm {

UpdateTimedate
UpdateTests
UpdateAccts
UpdateLaunchers
}
This simply calls the previously created functions that update each object on the form.
Adding a Date Refreshed label.
Since I am having the data refresh automatically, I added a label and textbox that shows when the data was pulled and a function to update the text box.
$lblTimedate = New-Object System.Windows.Forms.Label
$txtTimedate = New-Object System.Windows.Forms.textbox

#
# lblTimedate
#
$lblTimedate.AutoSize = $true
$lblTimedate.Font = New-Object System.Drawing.Font("Microsoft Sans Serif", 10,[System.Drawing.FontStyle]::Bold,[System.Drawing.GraphicsUnit]::Point, 0)
$lblTimedate.Location = New-Object System.Drawing.Point(46, 75)
$lblTimedate.Name = "lblTimedate"
$lblTimedate.Size = New-Object System.Drawing.Size(159, 20)
$lblTimedate.TabIndex = 8
$lblTimedate.Text = "Date Refreshed:"
#
# txtTimedate
#
$txtTimedate.AutoSize = $true
$txtTimedate.Font = New-Object System.Drawing.Font("Microsoft Sans Serif", 10,[System.Drawing.FontStyle]::Regular,[System.Drawing.GraphicsUnit]::Point, 0)
$txtTimedate.Location = New-Object System.Drawing.Point(200, 75)
$txtTimedate.Name = "txtTimedate"
$txtTimedate.Size = New-Object System.Drawing.Size(159, 20)
$txtTimedate.TabIndex = 9
$txtTimedate.Text = ""

Function UpdateTimedate {
$txtTimedate.Text = (Get-Date).ToString()
}
The result is:

This has actually proven quite useful so far. In the last week that I have had this running, I’ve been alerted to several instances where accounts have been disabled due to excessive login failures.

